CleanShot X
Capture your Mac's screen like a pro
CleanShot X — Official Website
Quick Take: CleanShot X
CleanShot X is the best screenshot tool on macOS, period. The capture-annotate-share workflow is so fast it changes how you communicate. Scrolling capture, OCR, screen recording, and cloud hosting cover every screenshot use case. The price ($29 one-time or $8/month) is fair for a tool you'll use dozens of times a day. The only competition is Shottr (free, fewer features) and macOS's built-in tools (free, far fewer features). If screenshots are part of your workflow, CleanShot X is not a luxury — it's a productivity essential.
Best For
- •Technical writers and documentarians who capture 10+ screenshots daily
- •QA engineers documenting bugs with annotated screenshots and recordings
- •Designers sharing visual feedback with developers
- •Anyone who needs scrolling capture or OCR from screenshots
What is CleanShot X?
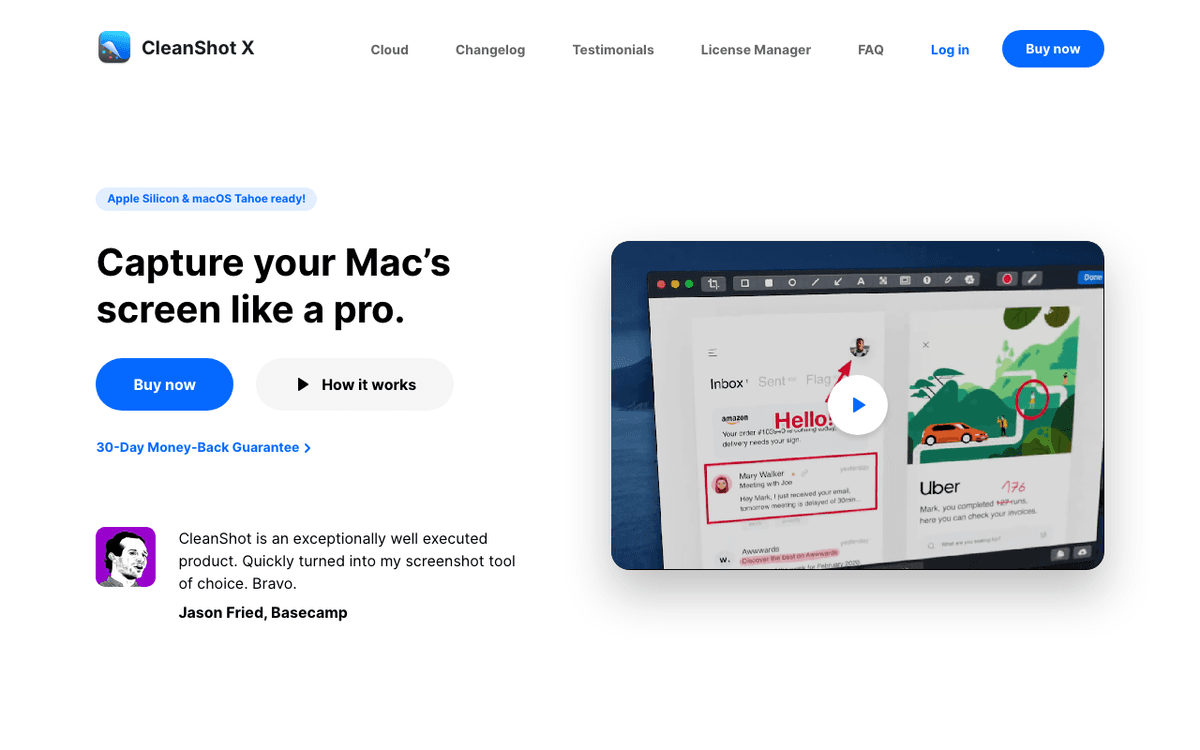
CleanShot X is a screenshot and screen recording tool for macOS that replaces the built-in Cmd+Shift+3/4/5 workflow with something substantially more capable. Capture your screen, annotate it immediately, upload to the cloud for a shareable link, OCR text from images, record video or GIF, capture scrolling content — all from one app. The core workflow is fast. Hit your capture shortcut, select an area, and CleanShot shows a floating thumbnail. From there you can annotate (arrows, text, blur, numbering), copy to clipboard, save to disk, or upload to CleanShot Cloud for an instant sharing link. The whole process — capture to shared link — takes about 5 seconds. Compare that to the macOS native workflow: capture, open in Preview, annotate with Preview's clunky tools, export, upload somewhere. CleanShot collapses that into a single flow. Scrolling capture is the feature that sold many people. Click 'Scrolling Capture,' scroll through a long webpage or document, and CleanShot stitches the frames into one tall image. The macOS screenshot tool can't do this at all. For documenting long pages, error logs, or email threads, scrolling capture eliminates the 'take 4 screenshots and stitch them in Photoshop' workaround. OCR (text recognition) extracts text from any screenshot. Capture a screenshot of a PDF, error dialog, or design mockup, and CleanShot copies the recognized text to your clipboard. This is useful when dealing with unselectable text in images, locked PDFs, or UI elements that don't support text selection. The OCR is fast and accurate for printed text. Screen recording produces MP4 video or GIF. You can record the full screen, a selected area, or a specific window. Audio capture (microphone and system audio) is supported. For quick demos and bug reports, recording a 30-second GIF and sharing the CleanShot Cloud link is faster than writing a description. CleanShot Cloud is the optional cloud hosting for your captures. Upload a screenshot or recording, get a link. Links are hosted on cleanshot.cloud with a clean viewer. Free plan includes 1 GB storage; Pro includes unlimited. You can set auto-delete periods, add password protection, and see view counts. For teams that share screenshots frequently (designers, QA, support), the cloud feature eliminates the need for separate image hosting. The pricing is a one-time $29 purchase (basic, includes 1 year of updates and 1 GB cloud) or $8/month for the subscription (ongoing updates, unlimited cloud). For a tool you use dozens of times a day, either price is reasonable. The honest take: CleanShot X is the best screenshot tool on macOS. It's not close. The only reason not to use it is if you genuinely only take one screenshot a month and the built-in tools are sufficient. If screenshots are part of your daily workflow — documentation, bug reports, design feedback, social media — CleanShot X is worth every penny.
Install with Homebrew
brew install --cask cleanshotDeep Dive: Why Screenshot Tools Matter More Than You Think
How a better screenshot workflow changes communication patterns in teams.
History & Background
macOS has always had basic screenshot capability (Cmd+Shift+3 since the original Mac OS). For years, the workflow was: capture, open in Preview, annotate with Preview's limited tools, save, upload somewhere. Third-party tools like Skitch (acquired by Evernote) tried to improve this but stagnated. CleanShot X launched and quickly became the standard recommendation. Its success wasn't because of any single feature but the speed of the full workflow — capture to shareable link in seconds.
How It Works
CleanShot X runs as a menu bar app that registers global keyboard shortcuts. The capture engine uses macOS screen capture APIs with enhancements for scrolling content (custom frame-by-frame capture with intelligent stitching). The annotation editor is a purpose-built canvas with vector tools optimized for screenshot markup rather than general-purpose drawing. Cloud uploads use CleanShot's CDN for fast global access. OCR runs locally using Apple's Vision framework.
Ecosystem & Integrations
CleanShot X integrates with the macOS screenshot shortcut system (replacing built-in shortcuts), clipboard, and file system. It's available on Setapp (subscription app bundle). The cloud feature competes with Droplr, CloudApp (now Zight), and simple image hosts. CleanShot's advantage is that capture, annotation, and hosting are one integrated workflow rather than separate tools.
Future Development
CleanShot continues to refine its annotation tools, improve scrolling capture reliability across more app types, and enhance cloud features. Recent updates have focused on performance, Apple Silicon optimization, and support for the latest macOS versions.
Key Features
Scrolling Capture
Select a region, click 'Start Scrolling Capture,' and scroll through the content. CleanShot captures frames as you scroll and stitches them into one continuous, tall image. Works with web pages, documents, code editors, email threads — anything that scrolls. The stitching algorithm handles overlapping regions intelligently, producing clean output without visible seams. This single feature saves hours of manual screenshot stitching for anyone who documents long content.
Annotation Tools
After capture, CleanShot's annotation editor provides arrows, rectangles, circles, lines, text labels, numbered steps, blur/pixelate (for hiding sensitive info), highlight, and emoji stamps. Tools are customizable: set arrow colors, line weights, text sizes, and blur intensity. Numbered steps are particularly useful for step-by-step guides — click to place sequential numbered circles. The annotation workflow is inline: capture, annotate, share — no need to open a separate editing app.
OCR Text Recognition
CleanShot extracts readable text from any capture. Take a screenshot of a dialog box, PDF, design mockup, or terminal output, and OCR copies the text to your clipboard. This works for printed text, UI elements, and even handwritten text with varying accuracy. The OCR runs locally — no data sent to external services. Most useful for grabbing text from non-selectable UI, error messages in screenshots, or extracting content from design files.
Screen Recording (Video & GIF)
Record your screen as MP4 video or animated GIF. Select a region, window, or full screen. Options include system audio capture, microphone input, cursor highlighting, and click indicators. GIF recording is ideal for quick bug demonstrations and Slack messages. Video recording handles longer tutorials and walkthroughs. Recordings can be trimmed in CleanShot before saving or uploading.
CleanShot Cloud
Upload captures to CleanShot's cloud hosting for instant shareable links. Links load in a clean viewer without ads. Features include auto-delete scheduling, password protection, and view count analytics. Free plan: 1 GB. Pro subscription: unlimited storage. For teams sharing screenshots in Slack or email, pasting a CleanShot link is faster and cleaner than attaching image files.
Desktop Cleanup (Hide Desktop Icons)
Before capturing, CleanShot can temporarily hide all desktop icons and set a plain wallpaper. This gives you a clean background for screenshots without manually moving files or changing your wallpaper. Useful for presentations, blog posts, and marketing materials where desktop clutter would be distracting.
Pin Screenshots
Pin a screenshot as a floating overlay on your screen. The pinned capture stays on top of all windows. Useful for referencing a design mockup while building it, keeping an error message visible while debugging, or comparing two states of a UI. Multiple pins can be active simultaneously.
Quick Access Overlay
After every capture, a small thumbnail appears in the corner of your screen. From this overlay, you can annotate, copy to clipboard, save to disk, upload to cloud, pin, or open in an editor — without interrupting your current work. If you don't interact with it, it fades away after a few seconds. This overlay is what makes CleanShot's workflow so fast: one capture action leads to all possible next actions.
Who Should Use CleanShot X?
1The Technical Writer
A documentation writer captures 30-50 screenshots per day for software guides. CleanShot's numbered steps annotation makes step-by-step guides consistent and fast to produce. Scrolling capture handles long settings pages and forms. OCR extracts exact text from UI elements for alt-text and descriptions. Cloud hosting provides permanent links that can be embedded in documentation without managing image hosting. The desktop cleanup feature ensures every screenshot has a clean background.
2The QA Engineer
A tester documents bugs with screenshots and recordings. They capture the buggy state, annotate it with arrows pointing to the issue, blur any sensitive data, and upload to CleanShot Cloud. The shareable link goes straight into the bug tracker. For interaction bugs, they record a 15-second GIF showing the steps to reproduce. The developer clicks the link, sees exactly what's wrong, and the bug description that would have taken 5 minutes to write is replaced by a 5-second screenshot.
3The Designer Giving Feedback
A design lead reviews implementation screenshots from developers. They capture the implemented UI, pin a reference design mockup on screen, and annotate differences with arrows and text ('padding should be 16px here, not 8px'). The annotated screenshot uploads to CleanShot Cloud and the link goes into the Slack design-review channel. Developers see exact, visual feedback instead of vague text descriptions.
How to Install CleanShot X on Mac
CleanShot X is available via Homebrew or direct download from cleanshot.com.
Install via Homebrew
Run: brew install --cask cleanshot. Alternatively, download from cleanshot.com and drag to Applications.
Grant Permissions
On first launch, grant Screen Recording permission (System Settings > Privacy & Security > Screen Recording) and Accessibility access. Both are required for capture and annotation features.
Set Your Keyboard Shortcuts
CleanShot X > Preferences > Shortcuts. Set shortcuts for Area Capture, Fullscreen, Window Capture, Scrolling Capture, and Recording. Many people remap to the same shortcuts macOS uses (Cmd+Shift+3/4/5) so the muscle memory transfers.
Configure Default Save Location
Preferences > General > Default save action. Choose: save to Desktop, save to a specific folder, copy to clipboard, or upload to CleanShot Cloud. You can also set this per-capture from the quick access overlay.
Pro Tips
- • Remap Cmd+Shift+3/4/5 from macOS's built-in screenshot to CleanShot. Disable the macOS shortcuts in System Settings > Keyboard > Keyboard Shortcuts > Screenshots.
- • Set up a CleanShot Cloud account even if you don't plan to use it heavily — it's useful for quick ad-hoc sharing.
- • Enable 'Show cursor in captures' if you're documenting mouse-driven workflows.
- • Use Cmd+Shift+X (or your custom shortcut) for scrolling capture — it's the feature that differentiates CleanShot from everything else.
Configuration Tips
Replace macOS Screenshot Shortcuts
Disable the built-in macOS screenshot shortcuts in System Settings > Keyboard > Keyboard Shortcuts > Screenshots. Then set CleanShot's shortcuts to the same keys (Cmd+Shift+3 for fullscreen, Cmd+Shift+4 for area, Cmd+Shift+5 for recording). Your muscle memory stays intact, but now every capture goes through CleanShot's superior workflow.
Set Default Annotation Style
In Preferences > Annotate, set your default arrow color, line weight, font, and blur intensity. Consistent annotation style across all your screenshots makes documentation look professional. Red arrows with 3px weight and San Francisco font is a clean default for technical documentation.
Configure Auto-Upload for Teams
If your team shares screenshots frequently, set the default save action to 'Upload to CleanShot Cloud and copy link to clipboard.' Every capture automatically uploads, and you just Cmd+V the link into Slack or your bug tracker. No manual upload step.
Enable Retina-Aware Capture
CleanShot captures at Retina resolution by default (2x pixels). If you're sharing screenshots in documentation that will be viewed at 1x, enable 'Capture at 1x' in Preferences to reduce file sizes. For most use cases, keep Retina enabled — the quality difference is visible.
Alternatives to CleanShot X
CleanShot X competes with both free built-in tools and other paid screenshot apps.
macOS Built-in Screenshots
Cmd+Shift+3/4/5 captures screens and records video. It's free, built in, and good enough for basic captures. It lacks scrolling capture, meaningful annotation tools, OCR, cloud hosting, desktop cleanup, and pin-to-screen. If you take fewer than 5 screenshots a week and never annotate, the built-in tools are fine. If screenshots are a regular part of your workflow, CleanShot X is a significant upgrade.
Shottr
Shottr is a free screenshot tool with surprisingly good features: annotation, scrolling capture, OCR, pixel measurement, and color picking. It's lightweight and fast. CleanShot X has a more polished annotation editor, cloud hosting, screen recording (Shottr doesn't record), and desktop cleanup. Shottr is the best free alternative to CleanShot X. If $29 is too much, try Shottr first.
Xnapper
Xnapper auto-beautifies screenshots with padding, background gradients, and shadows — great for social media and marketing. It focuses on making screenshots look pretty rather than being a complete capture workflow. CleanShot X is more comprehensive (recording, scrolling capture, OCR, cloud). If your primary need is beautiful screenshots for Twitter/X, Xnapper is purpose-built. For general productivity, CleanShot X covers more ground.
Snagit
Snagit ($62.99) is the enterprise screenshot tool with extensive annotation, video recording, templates, and asset management. It's feature-rich but heavy and expensive. CleanShot X is lighter, faster, cheaper, and has a more Mac-native feel. Snagit is better for large teams that need shared template libraries and enterprise support. For individual users and small teams, CleanShot X is the better value.
Pricing
One-time purchase: $29 for a single license (includes 1 year of updates, 1 GB CleanShot Cloud storage). After the year, continue using the app without updates or renew for $19/year. Cloud Pro subscription: $8/user/mo billed annually or $10/mo billed monthly (ongoing updates, unlimited CleanShot Cloud storage, custom domain and branding, advanced security features, team management). The one-time purchase is best if you want a tool that works and don't need heavy cloud storage. The subscription is better for teams and power users.
Pros
- ✓Scrolling capture creates seamless long-page screenshots
- ✓Fast capture-to-annotation-to-share workflow via the quick access overlay
- ✓OCR extracts text from any screenshot instantly
- ✓Screen recording produces MP4 and GIF without a separate app
- ✓CleanShot Cloud provides instant shareable links with a clean viewer
- ✓Desktop cleanup hides icons for presentable captures
- ✓Annotation tools include numbered steps, blur, and arrows
- ✓Pin screenshots as floating overlays for reference
- ✓One-time $29 purchase option — no mandatory subscription
Cons
- ✗Not free — $29 minimum when Shottr offers many features for free
- ✗Cloud hosting requires subscription for unlimited storage
- ✗macOS only — no Windows or Linux version
- ✗Annotation editor could be more powerful (no layer management, no shapes library)
- ✗The one-time purchase only includes 1 year of updates (renewable for $19/year)
Community & Support
CleanShot X is developed by a small team and provides support through email and a feedback portal. The user community is active on Twitter/X and Reddit's r/macapps, where users share tips, workflows, and feature requests. CleanShot has a blog with update announcements and feature guides. The app has won multiple Apple design awards and is consistently recommended in 'best Mac apps' roundups. The Setapp community (CleanShot is available on Setapp) provides additional discussion and reviews.
Video Tutorials
Getting Started with CleanShot X
More Tutorials
CleanShot X for Mac
CleanShot X • 51.2K views
10 Things I love about CleanShot X for Mac
A Better Computer • 33.5K views
Getting started with CleanShot X
MinorCo • 10.5K views
Frequently Asked Questions about CleanShot X
About the Author

Productivity & Workflow Analyst
Related Technologies & Concepts
Related Topics
Sources & References
Fact-CheckedLast verified: Feb 23, 2026
Key Verified Facts
- CleanShot X provides scrolling capture, OCR, and screen recording in addition to standard screenshots.[fact1]
- 1CleanShot X - Capture your Mac's screen like a pro
Accessed May 6, 2026
Research queries: CleanShot X Mac 2026 screenshot tool review